
Pixelation can be a frustrating problem that makes your videos look bad. This issue not only reduces the visual appeal but also affects the overall quality of the viewing experience, making it difficult to see details and enjoy the content as intended. If you're facing the same issue and don't know how to remove pixelation from your favorite videos, fear not. We live in an advanced world where solutions are at our fingertips.
However, pixelation is a common problem that can be fixed quickly with the right knowledge. In this article, we'll look at the latest video enhancement methods to help you fix pixelated videos. And also for us "How to fix pixelated videos" is not just a question, it's a complete exploration of innovative solutions. So, get ready to fix pixelated videos and enjoy the clarity and sharpness of your favorite videos once again.
Part 1. Possible Reasons Behind Pixelated Videos
Pixelation is an annoying problem in the digital video world that causes frustration among viewers. However, before we move forward, it is important to know the possible causes of grainy videos to effectively address the problem of how to make a video less pixelated. Here are several factors that contribute to visual distortion, including:
- Low Lighting Conditions: Insufficient lighting while filming videos may cause the camera to adjust by increasing ISO or using longer exposure times. This may result in noise or graininess, leading to pixelation when the footage is unclear.
- Improper Camera Settings Combination: Incorrect settings, such as a mismatch between frame rate and shutter speed or an incorrect white balance, may cause distorted or pixelated videos.
- Lower Aperture Setting: A lower aperture allows more light into the camera, but it also results in a shallow depth of field. This can occasionally lead to blurry or pixelated areas in the video, particularly if the focus is not precise.
- Higher ISO Settings: Increasing the ISO setting in low-light situations increases the camera's sensitivity to light. However, this can introduce noise or grain, resulting in pixelation and a decrease in overall video quality.
- Camera with a Small Sensor: Cameras with smaller sensors may struggle to record sufficient detail, particularly in low-light conditions, leading to pixelation or a lack of sharpness in the footage.
- Video Compression with Tiny File Size: Aggressive video compression reduces image quality by discarding data, which can cause pixelation or artifacts, particularly where there is a lot of motion or detail.
Part 2. How to Fix Pixelated Videos: 3 Effective Techniques
Overcoming the frustration of grainy or pixelated videos is a common goal for anyone looking to enhance their viewing experience. Also, video quality issues can arise from a variety of sources, but the good news is that there are numerous solutions available to address and correct these mistakes.
However, let's take a look at the three amazing solutions below and give it a try any of them that suits you better. Keep on reading!
Method No: 01. – Depixelate Video With Adobe After Effects
Adobe After Effects is a professional video editing software that offers a comprehensive suite of tools and effects to help you fix pixelated videos instantly. Its array of filters, including sharpening and noise reduction, allows you to improve video quality by fine-tuning details, reducing graininess, and increasing overall clarity. With Adobe After Effects, you can precisely adjust settings and apply filters to address pixelation issues, resulting in significantly improved video output.
To depixelate video using Adobe After Effects, follow these steps:
Step 1: First, get the After Effects from Adobe's official website and install it on your computer.
Step 2: Next, open Adobe After Effects, import your pixelated video, and drag it into the timeline to start working on it.
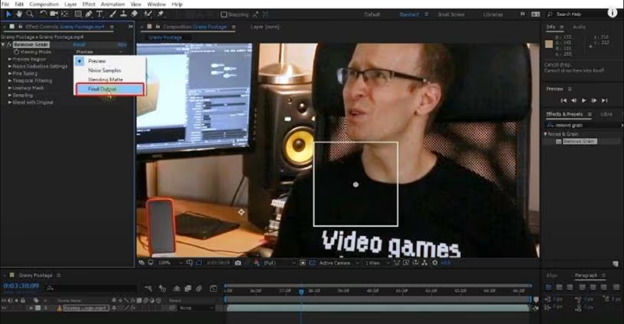
Step 3: After that, go to the Effects & Presets panel, find the "Remove Grain" effect, and drag it onto the video in the composition area to preview the changes.

Step 4: Now, in the effect's settings, select "Noise Reduction." Adjust these settings to reduce graininess and make the video look more natural.
Step 5: Next, change the preview mode to "Final Output" to apply the effect to the entire video.
Step 6: Lastly, export the video without any pixelation. And you’re done.
Method No: 02. – Fix Pixelated Video Files Using Wondershare Repairit Video Repair
Wondershare Repairit - Video Repair is a trustworthy solution for repairing damaged or pixelated video files. It offers a seamless video restoration experience by using sophisticated algorithms that can quickly diagnose and fix video glitches caused by pixelation, incomplete downloads, or corruption.
In addition, the software's user-friendly interface makes the repair process accessible to users of all technical abilities. With its help, anyone can easily enhance their videos with clarity and precision. However, if you're dealing with pixelation or complex video issues, Wondershare Repairit Video Repair stands out as your versatile and easy-to-use video recovery tool.
Moreover, this tool offers remarkable features that can help you in repairing your video files. You can also find step-by-step instructions below that can guide you on how to use this tool effectively.
Key Features
- Repair damaged videos with all levels of corruption, such as video not playing, video no sound, out-of-sync video or audio, playback errors, header corruption, flickering video, missing video codec, etc.
- Repair videos of 18 different formats, including MOV, MP4, MP3, M2TS, MKV, M4V, WMV, MPEG, ASF, etc.
- Repair damaged or corrupted videos caused by video compression, system crashes, video format changes, etc.
- Repair critically damaged or corrupted videos available on SD cards, mobile phones, cameras, USB flash drives, etc.
- Repairit has a quick and advanced scanning mode. You can use either depending on the level of corruption the video file has undergone.
- No limit to the number and size of the repairable videos.
- Support Windows 11/10/8/7/Vista, Windows Server 2003/2008/2012/2016/2019/2022, and macOS 10.10~macOS 14.
Step-by-Step Guide
Step 1: Begin the process by installing Wondershare Repairit Video Repair from its official website.
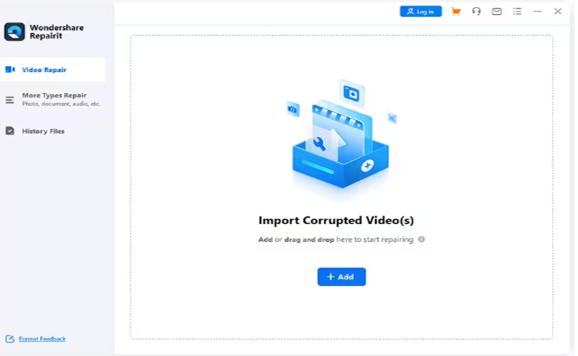
Step 2: Once the installation is complete, launch the tool and click on the "+Add" button to select the grainy and pixelated video files that you want to repair.
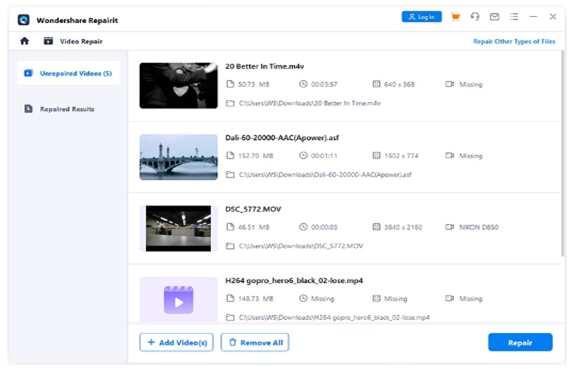
Step 3: After you've added all the videos, click on the "Repair" button to initiate the repair process.
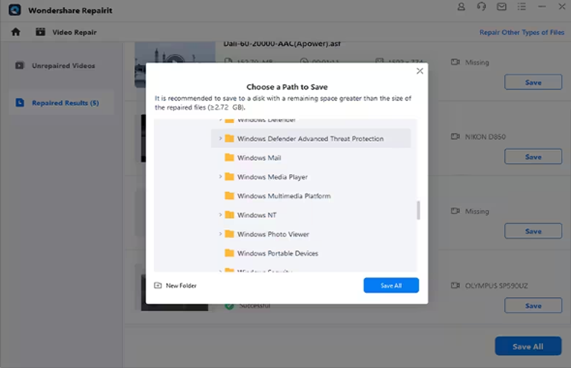
Step 4: The tool will take about 5-10 minutes to repair the videos. Once the repair process is complete, you can preview the repaired videos, click on the "Save All" button, and save them onto your PC. That’s it!
How to Fix Pixelated Video in Advanced Repair Mode
Here's how you can use the Advanced Repair mode in Wondershare Repairit to fix pixelated video:
- Collect sample videos that were taken using the same device as the corrupted video. These sample videos will serve as reference data for repairing the damaged video.
- Add the sample videos to the software, select the sample video, and click on "Repair" followed by "Save". Once the repair process is complete, a confirmation window will appear, indicating a successful repair.
- Click on "OK" to save and preview your newly repaired video, which will now be free from any graininess or corruption.

Method No: 03. – Limitation of Hardware Processing Capacity
Last but not least, pixelation in videos can sometimes occur due to limitations of the hardware used to play them. Additionally, high-resolution videos require a lot of processing power from your device. If your hardware is not powerful enough, it may struggle to handle the video causing pixelation in the playback.
Yet, there is no quick fix for this problem. However, the best solution is to upgrade to a more capable system that can handle high-resolution videos and ensure smooth playback without any pixelation.
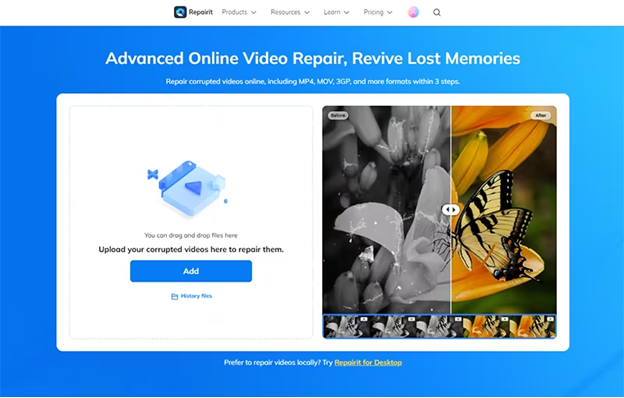
Part 3. How to Remove Pixelation From Video Online
If you're looking for a way to remove pixelation from video online without having to download any software, you can use the Wondershare Repairit Online Video Repair tool. It's a free online repair tool that can quickly fix all of your pixelated videos in just three simple steps, isn’t that great? Here are some of its amazing key features.
- Repair damaged videos with all levels of corruption, such as video not playing, video no sound, out-of-sync video or audio, playback errors, header corruption, flickering video, missing video codec, etc.
- It supports customers repairing 150 videos per month and supports each video of 3GB online.
- Repair critically damaged or corrupted videos available on SD cards, phones, cameras, USB flash drives, and more.
- The online version supports 10 video formats: MOV/MP4/M2TS/MKV/MTS/3GP/AVI/FLV/MXF/M4V.
- Security enough: videos are transferred via a 2048-bit encrypted connection and deleted after 3 hours.
To fix pixelated video, all you need to do is:
- Visit the website, and add all the pixelated videos.
- Next, click the repair button.
- Lastly, preview all the repaired videos and save them.
Wrapping It Up
So there you have it multiple ways to say goodbye to that irritating pixelation in your videos! You can use Adobe After Effects or opt for the user-friendly Wondershare Repairit Video Repair software. If you're struggling with hardware, upgrading it might be the best solution. Alternatively, you can try the Wondershare Repairit Online Video Repair tool, which can recover your videos with just a few clicks and without any downloads.
Lastly, whichever method you choose, you can now enjoy crystal-clear and uninterrupted video playbacks, ensuring that your viewing experience remains top-notch. So what are you waiting for? say goodbye to pixelation issues and hello to impeccable video quality!


