
Are you looking for a way to boost your gameplay by applying the best Windows 11 settings for gaming? Currently, Windows 11 is the most gaming-friendly operating system.
If you’re a game nerd, you'll agree with this. As game requirements continue to change, you might face some frustrating issues, such as lagging, slow loading times, and even crashes.
Besides, upgrading hardware, optimizing your operating system can also significantly boost your gaming performance. In this post, learn how to optimize Windows 11 for gaming in nine effective methods. Let's make your gameplay smoother now!
Before you start
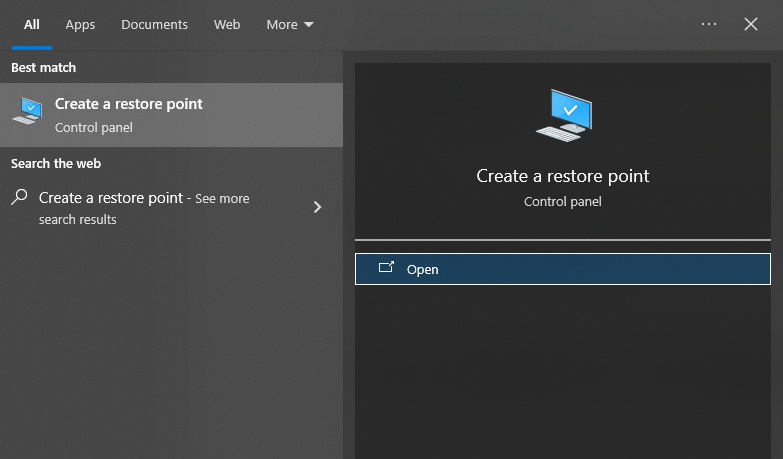
Before we launch into discussing solutions for optimizing Windows 11 for gaming, it’s highly recommended you create a restore point in case of any emergencies. If you don't know how to do that, follow the steps below:
Step 1: Press “Windows key + S” to open the “Search” box, and type “Create a restore point.” Hit “Enter.”
Step 2: Select “system drive” and following that click “Create.”
Step 3: Write a description for this restore point (e.g., “Before optimizing Windows 11 for gaming”). Finally, hit “Create.”
9 Tips on How to Optimize PC for Gaming Windows 11
Here’s how to optimize your PC for gaming in Windows 11 in nine ways according to your situation:
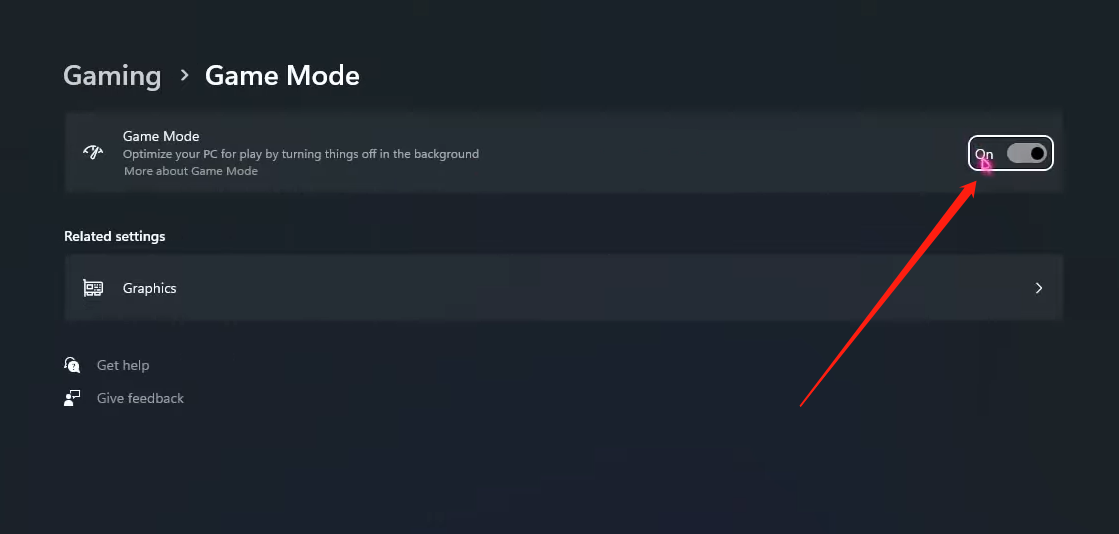
Tip 1: Turn on Game Mode
The very first thing you should do is to enable Game Mode. Introduced in Windows 10, this built-in feature is designed to allocate more CPU and GPU resources to your games, resulting in better gameplay.
Here’s how to enable this feature:
Step 1: Press the “Win + I” keys together at one time to open “Settings.”
Step 2: Then, search for “Turn on Game Mode” and select it from the list of results.
Step 3: Simply, toggle switch to turn it “ON.”
Tip 2: Increase Disk Space for Gaming
C drive is used not only as a backup space for virtual memory but also for storing cache files and temporary data generated during game runtime. Therefore, your games could run slow when there is insufficient space on your system drive. To optimize Windows 11 for gaming, consider using 4DDiG Partition Manager tool to extend your C drive.
With its versatility and simplicity, it has become one of the most highly acclaimed disk management tools in industry. It enables users to resize, partition, create, delete, and format partitions with just a few clicks. Additionally, this tool offers a disk cloning feature to prevent data loss when upgrading to a larger hard drive.
Given below is a guide on how to increase C drive space with 4DDiG Partition Manager:
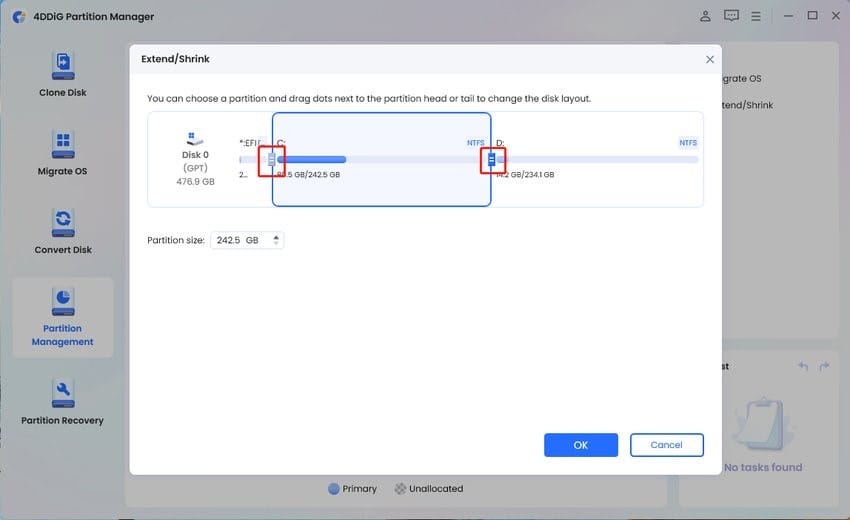
Step 1: Install and launch the partition manager tool on your computer. Choose the “Partition Management” tab. Then, right-click on the system drive or the drive you wish to extend. Choose “Resize/Move” from the menu that appears.

Step 2: To increase the size of the selected partition, drag its borders left or right as needed. Or, drag the border of an adjacent partition or unallocated space towards the target partition. Click “OK.”
Step 3: To apply changes, click “Execute 1 Task(s)” from the “Task” list. Then, confirm by clicking “OK.”
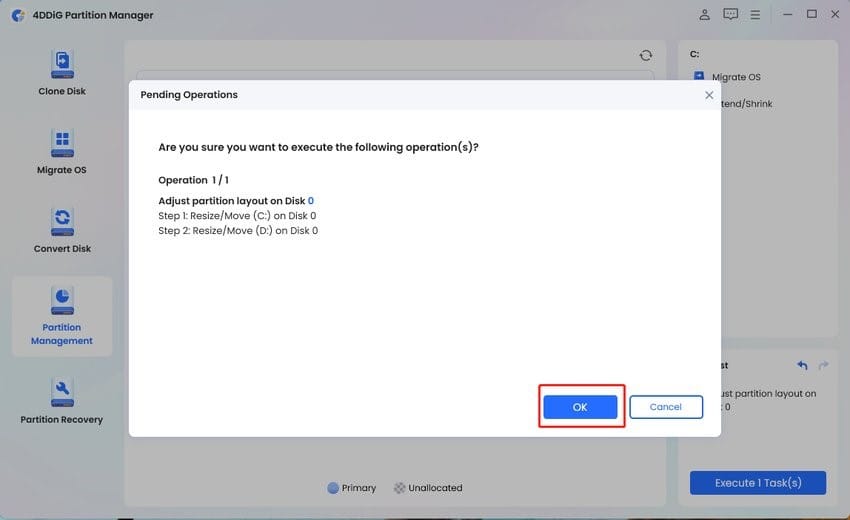
Step 4: Wait patiently for the process to complete before closing the program.
Tip 3: Keep GPU Drivers Up to Date
When it comes to Windows 11 optimization for gaming, updating your graphics card drivers is crucial. Yes, you heard it right. In most cases, gaming problems often occur due to outdated or buggy GPU drivers. One option is to visit the graphics card manufacturer’s website, and then search, download, and install the latest drivers. Alternatively, you can do it automatically with “Device Manager.”
To do so:
Step 1: Begin with right-clicking on the “Start” button and choose "Device Manager” from the menu.
Step 2: Click on the arrow next to Display adapters to extend the list. Then, perform a right-click on your graphics card and select “Update driver.”
Step 3: Select “Search automatically for updated driver software.” If a newer driver is found, it will be automatically downloaded and installed.
Tip 4: Enable Storage Sense
Storage sense is a real must-have for anyone serious about optimizing Windows 11 for gaming. This feature not only cleans up temporary and unnecessary files automatically but also reduces background processes to free up system resources.
Follow these steps to configure Windows 11 gaming settings:
Step 1: Open Settings, and use the search box in the upper left corner to look for “Storage Sense.”
Step 2: Make sure the “Storage Sense” feature is turned on under "Storage management.”
Step 3: Go inside it, and tick the box next to “Keep Windows running smoothly by automatically cleaning up the temporary system and app files.”
Step 4: Click “Run Storage Sense Now.” This will free up disk space.
Tip 5: De-animate Windows
Another effective way to optimize Windows 11 for gaming is to sacrifice some of the fancy visual effects, especially for low-end PCs.
Here is how:
Step 1: Type “Adjust the appearance and performance of Windows” into the “Search” box, then press “Enter” to open it.
Step 2: Select “Adjust for best performance” to optimize Windows visuals.
Step 3: Next, you’ll need to re-enable some essential Windows 11 gaming settings. Manually check boxes next to “Show thumbnails instead of icons” and “Smooth edges of screen fonts.”
Tip 6: Mute All Notifications
It is really annoying when notifications pop up at critical moments in the game. They also take up needed CPU power.
You can silence all notifications as follows:
Step 1: Open “Settings” by pressing “Windows + I.” Navigate to “System” > “Notifications.”
Step 2: Scroll down, and uncheck the box next to “Offer suggestions on how can I set up my device.”
Step 3: Also, unselect the box labelled “Get tips and suggestions when I use Windows.”
Tip 7: Disable Mouse Acceleration
In FPS games like Counter-Strike 2 and PUBG, mouse accuracy often determines the outcome of game. To improve your aiming, it’s a good idea to turn off the “enhanced pointer precision” feature on Windows 11.
To do so:
Step 1: In the “Settings” window, go to “Devices” > “Mouse” >"Related settings">"Additional mouse options."
Step 2: Switch to the “Pointer Options” tab and find a setting called “Enhance pointer precision.” Make sure to uncheck this option.
Step 3: Click on “Apply” at the bottom of the window to save your changes.
Tip 8: Custom Power Plan
Still wondering how to optimize gaming performance on Windows 11? In fact, there's no such thing as “best' Windows 11 settings for gaming.” Instead, it’s about your personal choice. Let's take power plans as an example.
By default, Windows typically uses “Balanced mode,” which is suitable for most mid to high-end computer users. However, if you’re seeking higher and smoother performance, especially for users with low-end computers, consider switching to “'High Performance” mode.
Tip 9: Turn off the Xbox Game Bar
Overlays in gaming Like Xbox Game Bar can disrupt your gameplay especially if you’re using a controller. However, you can turn it off to resume gameplay without distractions.
To do so follow the steps below:
Step 1: Press “Windows + S” and type “Settings” in the Windows search bar. Go to “Gaming,” then choose “Xbox Game Bar” to open it.
Step 2: In Windows 10, you can turn off “Xbox Game Bar” completely but in Windows 11, you can only disable its shortcut.
Step 3: To uninstall “Xbox Game Bar” entirely, open Windows PowerShell and type: “Ge-AppxPackage Microsoft.XboxGamingOverlay | Remove-AppxPackage.” Hit “Enter.”
That’s all you need to know about Windows 11 optimization for gaming!
Final Words
Now, you should say goodbye to any worries about how to optimize your PC for gaming on Windows 11 with these 9 tips.
Remember to keep enough available space on your system drive to ensure a smooth gaming experience. Moreover, if you don’t want to spend hundreds of dollars on a larger hard drive, try using 4DDiG Partition Manager to expand your C drive.


